

How To Draw a Jeep
Jeeps have been around for nearly seventy-five years, making them a true classic. Jeeps are well-liked both on and off the road due to their reliability and adaptability. Learning how to draw a jeep may be a lot of fun if you like sketching vehicles or if you are a fan of the jeep brand.
Here, we’ll show you how to sketch a Jeep in simple steps. Everything you need to know to design a jeep that looks like it was plucked off the streets, from where to find the correct reference photos to how to add the finishing touches, will be covered in this guide. This guide is intended for artists of all skill levels, so anyone can pick it up and start making progress right away.
If you want to know how to draw a jeep, then let’s get going! We hope that this guide will benefit you, whether you’re an amateur artist trying to hone your craft or a professional artist looking to push your work to the next level.
Collecting Sources

It is recommended that you have all the necessary supplies on hand before starting to sketch your vehicle. The tools and supplies you need to complete a drawing project depend on your personal preferences and ability level. What follows is a list of resources that might be useful to you:
The quality of the paper you use will have a significant impact on the final look of your work. Paper that can be erased and blended easily is best for a jeep drawing. You may use either drawing paper or bristol board.
The most popular sketching implement is the pencil, which may be found in a variety of sizes and hardnesses. For a drawing of a jeep, softer pencils (such as HB or 2B) will provide cleaner lines that convey more detail. You should also have a couple of tougher pencils (such as H or 2H) for quick sketches and for drawing clean, detailed lines.
A drawing would be incomplete without the use of erasers, which allow the artist to erase mistakes and discard unneeded strokes. Kneaded erasers are great for erasing a jeep drawing since they are flexible and won’t tear the paper.
You may also want to use a ruler, compass, or blending tools, but this is up to you and how detailed you want your design to be (such as a blending stump or your finger).
You should think about your experience and objectives before making any purchases. You may choose to use less complex equipment and supplies at first if you’re just getting started. However, if you’re an established artist, you might want to try your hand at some more complex mediums to test your limits and produce more impressive results. In the end, it’s up to you and the impression you want to create with your work to determine which materials are best.
Creating a Rough Draft
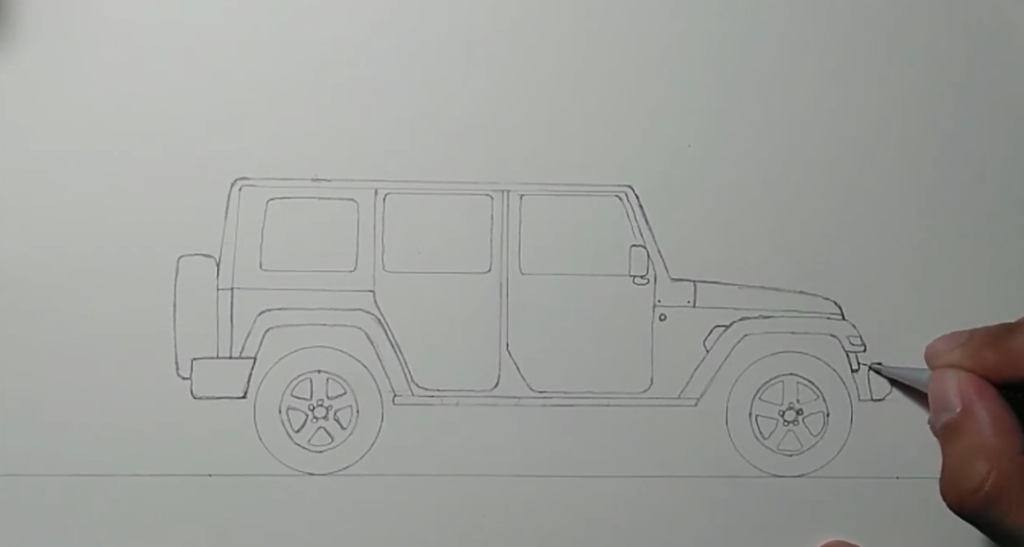
“Once you have all your supplies together, you can begin sketching your jeep. To start off how to draw a jeep, a rough outline or sketch of the vehicle’s fundamental form is the first phase. In doing so, you’ll have a guideline to follow, which will make it much easier to get accurate proportions and perspective.
To get started, sketch out the vehicle’s general outline. The top, wheels, and entire body will all be covered by this. Since you want to erase and refine this sketch later, you can use light lines. Draw the jeep with an eye on the vehicle’s boxy, angular design.
Then, finish out the jeep by adding in the finishing touches like the doors, grille, headlights, and bumper. To ensure accuracy, you might utilize pictures or images as a guide. Use light strokes for this drawing once again, as you will be adding to and refining the existing lines later.
Keep in mind the dimensions and perspective as you sketch the shape of your vehicle. A well-balanced jeep will have elements that are in appropriate proportion to one another and the whole. To ensure accurate dimensions, a ruler or grid might be used.
When you have the basic shape of your vehicle drawn out, you can go back and add details.
Details to Add
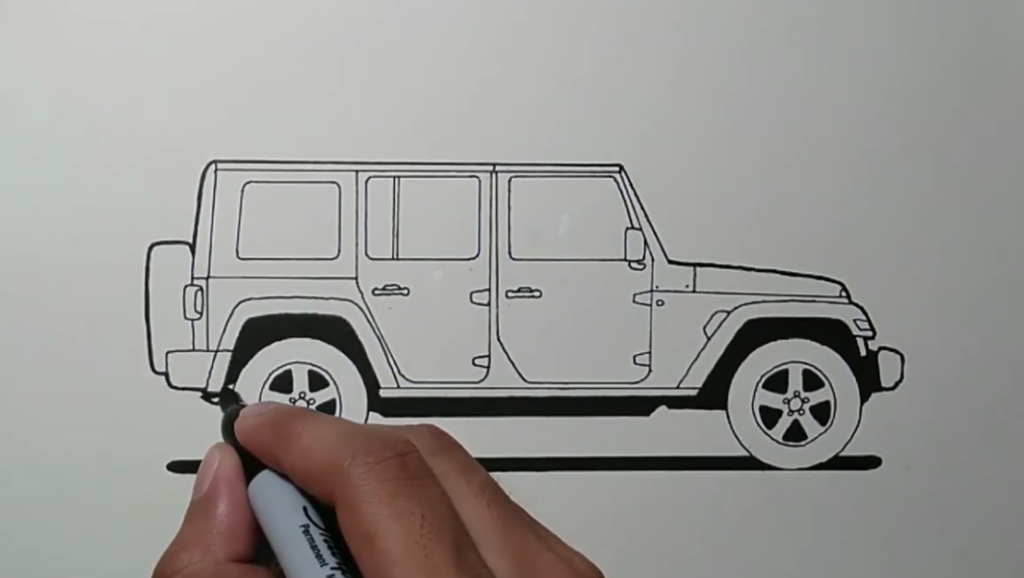
After you’ve got the basic shape of your vehicle down on paper, it’s time to start filling it in. This is the stage where your vehicle will take on a new, more lifelike appearance.
The first step is to sharpen your sketch’s lines. Use darker lines to emphasize the Jeep’s contours and features, and remove everything that isn’t needed. Shading may also be used to give a drawing a sense of depth and dimension.
Afterward, your attention should turn to the Jeep itself and its accompanying elements. The wheels, doors, grille, headlights, and bumper will all be a part of this. To ensure accuracy, you might utilize pictures or images as a guide. To make the features look more realistic and three-dimensional, you should focus on their forms and proportions and apply shading, among other approaches.
Include the dashboard, seats, and steering wheel in your Jeep’s interior in addition to the outside characteristics. To reiterate, using reference photographs or photos can help you get the details accurately, while shading and other methods will give realism and depth.
As you add more and more features to your jeep design, keep an eye on the drawing’s overall realism and lifelike aspects. Adding realistic details like shading and texture may help make your drawing look more believable and lifelike. It’s recommended that you try out a variety of approaches and resources to see what works best for you.
Polishing Off the Details
“Now that you have the major components of your jeep drawing established, it’s time to refine the finer elements. This is the stage at which your drawing will receive its final, convincing appearance.
Shading is a great way to make a drawing look more realistic. Shading is the process of adding the appearance of depth and dimension to a scene by utilizing a variety of tones and values. Hatching, cross-hatching, blending, and stippling are just few of the methods you might employ to create various effects. Try using several mediums and approaches (such charcoal, pastels, and graphite pencils) to discover your groove.
It’s possible that shading isn’t the only thing missing from your jeep drawing. Embellishing with embellishments like decals, emblems, and other marks of individuality is one possibility. To add diversity and interest to your design, you may also want to try out other colors or effects (such a matte or glossy finish).
Pay attention to the drawing’s overall balance and composition as you finish detailing your vehicle. Check that the drawing as a whole flows smoothly and looks good. Drawing a realistic and lifelike jeep is possible with some effort and focus on the finer details.
Conclusion
To sum up, designing a jeep is a great way to exercise your imagination, develop your sense of design, and have some fun while doing it. This lesson will teach you how to design a realistic and lifelike jeep using the techniques and processes described below.
We trust that you’ve learned something from this guide and are better equipped to draw automobiles in the future. If you’ve found this lesson helpful and are eager to learn more, we recommend exploring the supplementary materials we’ve given, which include links to further sketching guides and advice on where to get creative inspiration.
If you have any interest in jeeps, feel free to post your own drawings or ask for critiques. There is always something new to learn and discover in the realm of sketching, whether you’re just starting out or have been doing it for years. Begin out your sketchbooks and get to work on your next jeep design right away!


